TIL(1월) - 1
틀린 내용이나 본문의 내용과 다른 의견이 있으시면 댓글로 남겨주세요!
01/10
Java의 HashMap
키에 대한 해시 값을 사용하여 값을 저장하고 조회한다. 키-값 쌍의 개수에 따라 동적으로 크기가 증가한다.
X, Y 객체가 있을 때 X.equals(Y) == false 일 때, X.hashcode() != Y.hashcode()라고 한다면 여기서 사용하는 해시 함수는 perfect hash function 이라고 한다. 이렇게 완전 해시 함수가 아니면 모든 원소에 대해 O(1)로 접근할 수 없다.(동일한 해시값을 가지는 값들이 있을 수 있다) 하지만 이렇게 완전 해시 함수를 만들 수 없다.
그래서 해시 충돌이 발생할 수 밖에 없는데, 충돌이 ㅂ라생 하더라도 키-값 쌍 데이터를 잘 저장하고 조회할 수 있게 하는 방식이 대표적으로 2가지가 있다.(Open Addressing, Separate Chaining)
Open Addressing은 데이터를 넣으려는 해시 버킷이 사용 중일 경우 다른 곳에 넣는다.
Separate Chaining은 해당 인덱스에 링크드 리스트로 넣는다.
Java의 HashMap에서 사용하는 것은 Separate Chaining이다. Java 8 에서는 데이터의 개수가 많아지면 Separate Chaining에서 Linked List 대신 트리를 사용한다.
/**
 * The bin count threshold for using a tree rather than list for a
 * bin.  Bins are converted to trees when adding an element to a
 * bin with at least this many nodes. The value must be greater
 * than 2 and should be at least 8 to mesh with assumptions in
 * tree removal about conversion back to plain bins upon
 * shrinkage.
 */
static final int TREEIFY_THRESHOLD = 8;

/**
 * The bin count threshold for untreeifying a (split) bin during a
 * resize operation. Should be less than TREEIFY_THRESHOLD, and at
 * most 6 to mesh with shrinkage detection under removal.
 */
static final int UNTREEIFY_THRESHOLD = 6;
위 처럼 하나의 해시 버킷에 8개 이상일 경우엔 Tree, 6개 이하가 되면 LinkedList를 사용한다. 여기서 사용하는 트리는 Red-Black Tree이다.
해시 버킷의 개수는 초기에 static final int DEFAULT_INITIAL_CAPACITY = 1 << 4; // aka 16, 최대 값은 static final int MAXIMUM_CAPACITY = 1 << 30; 2^30 이다. 버킷 개수가 두배로 증가하는 임계점은 default static final float DEFAULT_LOAD_FACTOR = 0.75f; 0.75이다.
해시 함수를 사용했을 때 index의 값이 균등하게 분포 해야 좋다. 그래서 별도의 보조 해시 함수를 이용해서 index 값이 가급적 균등하게 분포하도록 만든다.
참고자료(Hash)
01/09
Java에서 LinkedList
자바의 LinkedList는 양방향 LinkedList로 구현되어 있다.
LinkedList는 Node<E> first; 와 Node<E> last;를 가지고 있다.
알다시피 LinkedList를 인덱스로 조회할 때는 O(n)의 시간복잡도다. get(index) 메서드는 다음과 같이 구성되어있다.
public E get(int index) {
    checkElementIndex(index);
    return node(index).item;
}

Node<E> node(int index) {
    // assert isElementIndex(index);

    if (index < (size >> 1)) {
        Node<E> x = first;
        for (int i = 0; i < index; i++)
            x = x.next;
        return x;
    } else {
        Node<E> x = last;
        for (int i = size - 1; i > index; i--)
            x = x.prev;
        return x;
    }
}
코드를 보면 조회를 할 index가 시작 노드와 가까우면 시작부터 조회, 끝 노드와 가까우면 끝에서부터 조회한다. 시간복잡도로 따지면 O(n/2)이기 때문에 결국 O(n)이다.
대신 첫 노드나, 마지막 노드에 insert/delete 할 경우엔 O(1)의 시간복잡도를 갖는다. 그리고 중간에 insert/delete 할 경우엔 해당 노드를 찾는 시간(n번째일 경우 O(n)) + insert/delete 시간(O(1)) 이므로 O(n)이다.
ArrayList와 LinkedList의 시간복잡도를 표로 나타내보면,
| 구분 | ArrayList | LinkedList |
|---|---|---|
| Index로 조회 | O(1) | O(n) |
| 첫 노드에 Insert/Delete | O(n) | O(1) |
| 끝 노드에 Insert/Delete | O(1) | O(1) |
| 중간에 Insert/Delete | O(n) | 조회시간 + O(1) = O(n) |
참고로 Java에서 ArrayList는 다음과 같다.
- ArrayList
- default capacity: 10이다. MAX_ARRAY_SIZE: MAX_INT - 8 이다.
- ArrayList에 add 할 때 공간이 부족하면 현재 있는 값들을 복사하고 add한다.
- 공간이 부족하면 기존 사이즈의 1.5배를 해서 새로운 Array를 만들고 값을 복사한다.
- add에서 동작을 보면 thread-safe 하지 않다.
PreparedStatement 와 Statement
PreparedStatement는 쿼리에 인자를 넘길 수 있다. 처음에 pre-compile 이후 재 컴파일 하지 않는다.(여러 번 사용될 때 더 빠르다)
PreparedStatement는 SQL injection 을 예방할 수 있다. DB에는 컴파일 된 쿼리문을 전달한다. DB쿼리에 사용되는 외부 입력값에 대하여 특수문자 및 예약어를 필터링한다.
Statement에서 만약 사용자로부터 userId를 받아서 User table에서 조회하는 메서드가 있다고 생각해보면 아래와 같은 sql injection이 가능해진다.
private void injectExample(String userId) throws SQLException {
    String sql = "SELECT * FROM users WHERE user_id = '" + userId + "'";

    try (Connection con = dataSource.getConnection();
        Statement stmt = conn.createStatement()) {
            stmt.execute(sql);
    } catch (Exception e) {
        logger.error("Error occurred while executing Query", e);
        throw new JdbcTemplateException(e);
    }
}
위와 같은 구현이라고 생각 했을 때 userId에 "martin; delete from users;" 와 같은 식으로 모든 데이터를 날려버릴 수 있는 sql injection을 할 수 있다. PreparedStatement를 사용할 경우 DB에 pre-compile된 쿼리를 날리기 때문에 SQL Injection이 불가능 하다. 사용자는 preparedStatement에 바인딩된 파라미터에 대한 값만 조정할 수 있게 한다. 그렇다고 해서 다음과 같이 짜면 똑같이 SQL Injection이 가능하다. 이렇게 하지 말자.
private void injectExample(String userId) throws SQLException {
    String sql = "SELECT * FROM users WHERE user_id = '" + userId + "'";

    try (Connection con = dataSource.getConnection();
        PreparedStatement pstmt = conn.preparedStatement(sql)) {
            pstmt.execute();
    } catch (Exception e) {
        logger.error("Error occurred while executing Query", e);
        throw new JdbcTemplateException(e);
    }
}
01/08
Java는 Call by value vs. Call by reference
Call by value는 예상한 그대로 함수 호출에서 값을 복사 하는 것이다.
Call by reference는 변수의 주소를 전달 하는 것이다. 가장 흔한 예시를 들어보면, 다음과 같다.
void swap(int *a, int *b) {
    int temp = *b;
    *b = *a;
    *a = temp
}

int a = 1;
int b = 2;
swap(&a, &b);
printf("a: %d, b: %d", a, b); // a: 2, b: 1
이렇게 swap 메서드를 호출한 후에 메서드 밖에서 값을 확인해보면 변경된 값이 나온다.
그러면 java는 call by reference인가? 단순하게 생각해봤을 때는 당연히 call by reference라고 생각했다.
하지만 JAVA는 항상 call by value이다. 메서드의 파라미터로 객체를 넘길 때, 그 객체의 레퍼런스를 넘긴다. 그렇기 때문에 헷갈릴 수 있다.
public static void main(String[] args) {
    Dog aDog = new Dog("Max");
    Dog oldDog = aDog;

    // we pass the object to foo
    foo(aDog);
    // aDog variable is still pointing to the "Max" dog when foo(...) returns
    aDog.getName().equals("Max"); // true
    aDog.getName().equals("Fifi"); // false
    aDog == oldDog; // true
}

public static void foo(Dog d) {
    d.getName().equals("Max"); // true
    // change d inside of foo() to point to a new Dog instance "Fifi"
    d = new Dog("Fifi");
    d.getName().equals("Fifi"); // true
}
Stack Overflow에 나온 예시를 살펴보면 위와 같다. foo 메서드 호출 이후에 aDog.getName()이 여전히 Max가 나온다. 만약 foo 메서드의 Dog가 reference가 넘어가는 것이었으면 이 레퍼런스에 새로운 new Dog(“Fifi”)를 넣었으니 main에서 aDog.getName()이 Fifi가 나왔어야 한다. 하지만 Max 이므로 call by value임을 알 수 있다.
저렇게 이름을 바꾸고 싶다면, 아래 코드처럼 구현하면 된다. 하지만 객체의 참조 자체는 동일하다.
public static void main(String[] args) {
    Dog aDog = new Dog("Max");
    Dog oldDog = aDog;

    foo(aDog);
    // when foo(...) returns, the name of the dog has been changed to "Fifi"
    aDog.getName().equals("Fifi"); // true
    // but it is still the same dog:
    aDog == oldDog; // true
}

public static void foo(Dog d) {
    d.getName().equals("Max"); // true
    // this changes the name of d to be "Fifi"
    d.setName("Fifi");
}
그러나 call by reference 처럼 객체의 참조 자체를 변경하는 것은 자바에서 불가능하다.
참고자료(Call by reference)
01/07
어댑터 패턴
어댑터는 220V -> 110V 로 전환해주는 어댑터라고 생각하면 된다. 어떤 인터페이스를 클라이언트에서 요구하는 형태의 인터페이스에 적용시켜 준다.
정의: 한 클래스의 인터페이스를 클라이언트에서 사용하고자 하는 다른 인터페이스로 변환합니다. 어댑터를 이용하면 인터페이스 호환성 문제 때문에 같이 쓸 수 없는 클래스들을 연결해서 쓸 수 있습니다.
디자인 패턴 책에 나와있는 예제를 써보면,
public interface Duck {
    public void quack();
}
public class WildDuck implements Duck {
    @Override
    public void quack() {
        System.out.println("Quack");
    }
}

public interface Turkey {
    public void gobble();
}

public class WildTurkey implements Turkey {
    @Override
    public void gobble() {
        System.out.println("Gobble gobble")
    }
}
이런 상황에서 Duck 객체를 이용해서 Turkey 객체를 만들어야 한다고 해보자. 이럴 경우 다음과 같이 하면 된다.
public class TurkeyAdapter implements Duck {
    private Turkey turkey;

    public TurkeyAdapter(Turkey turkey) {
        this.turkey = turkey;
    }

    @Override
    public void quack() {
        turkey.gobble();
    }
}
이런 식으로 요청을 위임하는 식으로 어댑터를 구현할 수 있다.
내 생각이지만, Spring에서 HandlerAdapter의 구현체 중 SimpleControllerHandlerAdapter, HttpRequestHandlerAdapter를 보면 Handler를 사용하고자 하는 Controller, HttpRequest의 형태로 변환하여 메서드를 호출한다.
public class SimpleControllerHandlerAdapter implements HandlerAdapter {

    @Override
    public boolean supports(Object handler) {
        return (handler instanceof Controller);
    }

    @Override
    @Nullable
    public ModelAndView handle(HttpServletRequest request, HttpServletResponse response, Object handler)
            throws Exception {

        return ((Controller) handler).handleRequest(request, response);
    }

    @Override
    public long getLastModified(HttpServletRequest request, Object handler) {
        if (handler instanceof LastModified) {
            return ((LastModified) handler).getLastModified(request);
        }
        return -1L;
    }
}
public class HttpRequestHandlerAdapter implements HandlerAdapter {
    @Override
    public boolean supports(Object handler) {
        return (handler instanceof HttpRequestHandler);
    }

    @Override
    @Nullable
    public ModelAndView handle(HttpServletRequest request, HttpServletResponse response, Object handler)
            throws Exception {

        ((HttpRequestHandler) handler).handleRequest(request, response);
        return null;
    }

    @Override
    public long getLastModified(HttpServletRequest request, Object handler) {
        if (handler instanceof LastModified) {
            return ((LastModified) handler).getLastModified(request);
        }
        return -1L;
    }
}
HandlerAdapter를 통해 Handler 인터페이스를 원하는 인터페이스(Controller, HttpRequest)로 변경한다.
참고자료(어댑터 패턴)
- Head First Design Pattern
- Spring Web MVC 5.2.0 Release source
01/06
JPA @transactional 동작 과정
ArticleService에 다음과 같은 메서드가 있다고 해보자.
@Transactional(readOnly = true)
public Article findById(long articleId) {
    return articleRepository.findById(articleId)
            .orElseThrow(NotFoundArticleException::new);
}
@Transactional이 달려있는 findById가 들어있는 ArticleService는 프록시 객체가 생성된다. 이 프록시 객체가 findById 메서드를 실행 시킨다.(method invoke)
@Override
@Nullable
public Object invoke(MethodInvocation invocation) throws Throwable {
    // Work out the target class: may be {@code null}.
    // The TransactionAttributeSource should be passed the target class
    // as well as the method, which may be from an interface.
    Class<?> targetClass = (invocation.getThis() != null ? AopUtils.getTargetClass(invocation.getThis()) : null);

    // Adapt to TransactionAspectSupport's invokeWithinTransaction...
    return invokeWithinTransaction(invocation.getMethod(), targetClass, invocation::proceed);
}
트랜잭션을 가지고 아래의 invokeWithinTransaction 메서드를 실행한다.
@Nullable
    protected Object invokeWithinTransaction(Method method, @Nullable Class<?> targetClass,
            final InvocationCallback invocation) throws Throwable {
PlatformTransactionManager에서 commit, rollback을 한다.
protected void commitTransactionAfterReturning(@Nullable TransactionInfo txInfo) {
    if (txInfo != null && txInfo.getTransactionStatus() != null) {
        if (logger.isTraceEnabled()) {
            logger.trace("Completing transaction for [" + txInfo.getJoinpointIdentification() + "]");
        }
        txInfo.getTransactionManager().commit(txInfo.getTransactionStatus());
    }
}
@Transactional을 이해하기 위해서는 Spring AOP를 먼저 이해 해야 할 것 같다. @Transactional 이 붙어 있는 메서드가 실행될 때 AOP방식으로 트랜잭션을 시작하고 끝낸다. 이 트랜잭션이 종료될 때 커밋을 하고, 중간에 UncheckedException이 발생하면 롤백한다.
readOnly = true 속성은 트랜잭션 내에서 데이터를 조작하는 시도를 막아줄 수 있다. Read, Write DB를 따로 쓸 경우 성능이 향상될 수 있다.
01/05
Github Actions와 Github Secret
참고: github actions에서 secrets은 forked repository에서의 workflow에서 접근할 수 없다. 공식 문서에는 아래처럼 나와있다.
With the exception of GITHUB_TOKEN, secrets are not passed to the runner when a workflow is triggered from a forked repository.
To provide an action with a secret as an input or environment variable, you can use the secrets context to access secrets you’ve created in your repository.
프로젝트에서 Github, Kakao 인증 방식으로 회원 가입을 구현할 예정이기 때문에, 여러 설정 파일이 필요할 것 같다. 아마 kakao.yml(kakao clientId, client Secret등이 들어있는..), github.yml(마찬가지로 clientId, clientSecret 등) 파일들로 관리할 것이다.
그러나 이 yml 파일에 들어있는 secret들은 외부로 노출되면 안되는 정보이기 때문에, 실제 배포서버에 직접 넣거나(수동으로) 아니면 github의 private repository에서 가져오는 방식으로 구현할 수도 있을 것이다. Jenkins나 Travis CI와 같은 CI 툴을 사용하면 환경 변수로 지정해서 넣어줄 수도 있는 것으로 알고 있다.
그러니까 Github Actions도 당연히 되겠지? 라는 생각으로 github actions에서 환경변수로 secret을 관리하기로 했다. Github repository의 settings에서 secret을 관리할 수 있다.

여기서 Add a new secret을 누르고 이름과 내용을 적어주면 된다. 이름을 SuperSecret으로 하고 내용에 각 clientId, clientSecret을 담아둔다고 해보자. 여기서 설정한 이름(SuperSecret)으로 이제 action.yml 파일에서 아래와 같이 with나 env로 환경변수로서 사용할 수 있게 된다.
steps:
  - name: Hello world action
    with: # Set the secret as an input
      super_secret: $
    env: # Or as an environment variable
      super_secret: $
이 이후에는 actions workflow에서 gradle build 전에 환경변수 secrets.SuperSecret의 내용을 복사해서 기존에 사용했던 github.yml 파일의 위치에 동일한 이름으로 만들어주었다. 그래서 gradle build시에 인수테스트를 돌면서 github yml 파일이 없어서 돌지 않던 인수 테스트까지 따로 코드 수정 없이, 또는 테스트 제외하지 않고, client secret을 노출하지 않고, github actions으로 기존 방식(PR요청시 build 확인)대로 진행할 수 있었다.
참고 자료(Github actions)
01/04
Spring REST Docs
Spring MVC Test로 생성된 snippets으로 문서화를 한다.
Spring REST Docs는 RESTful service의 정확하고 읽기 쉬운 문서를 만드는 것을 도와준다. Spring REST Docs를 이용하는 첫 단계는 build.gradle 설정하는 것이다.
plugins {
    id "org.asciidoctor.convert" version "1.5.9.2"
}

dependencies {
    asciidoctor 'org.springframework.restdocs:spring-restdocs-asciidoctor:{project-version}'
    testCompile 'org.springframework.restdocs:spring-restdocs-mockmvc:{project-version}'
}

ext {
    snippetsDir = file('build/generated-snippets')
}

test {
    outputs.dir snippetsDir
}

asciidoctor {
    inputs.dir snippetsDir
    dependsOn test
}
생성된 문서를 jar 파일에 패키징 하고 싶으면, 다음과 같이 하면 된다.
- jar 파일이 빌드 되기 전에 문서를 만든다
- 생성된 문서를 jar 파일에 포함시킨다.
bootJar {
    dependsOn asciidoctor
    from ("${asciidoctor.outputDir}/html5") {
        into 'static/docs'
    }
}
Spring REST Docs와 WebTestClient를 사용해서 문서화를 할 때는 테스트코드에 다음과 같은 코드들을 추가 해주어야 한다.
@ExtendWith(RestDocumentationExtension.class)
@SpringBootTest(webEnvironment = SpringBootTest.WebEnvironment.RANDOM_PORT)
public class RestDocsTestControllerTest {
    @Autowired
    private WebTestClient webTestClient;

    @LocalServerPort
    private String port;

    @BeforeEach
    void setUp(RestDocumentationContextProvider restDocumentation) {
        webTestClient = WebTestClient.bindToServer()
                .baseUrl("http://localhost:" + port)
                .filter(documentationConfiguration(restDocumentation))
                .build();
    }

    @Test
    void 게시글_생성_테스트() {
        webTestClient.post()
                .uri("/api/articles")
                .body(BodyInserters.fromFormData("title", TITLE)
                        .with("content", CONTENT))
                .exchange()
                .expectStatus().isCreated()
                .expectBody()
                .consumeWith(document("article/create",
                        requestParameters(
                                parameterWithName("title").description("생성할 게시글 제목"),
                                parameterWithName("content").description("생성할 게시글 내용"),
                        ),
                        responseHeaders(
                                headerWithName("Location").description("생성된 게시글 경로")
                        ),
                        responseFields(
                                fieldWithPath("articleId").description("생성된 게시글 번호"),
                                fieldWithPath("title").description("생성된 게시글 제목"),
                                fieldWithPath("content").description("생성된 게시글 내용"),
                                fieldWithPath("createdDate").ignored(),
                                fieldWithPath("lastModifiedDate").ignored()
                        )
                ));
    }
RESTDocs는 기본적으로 6가지의 snippet을 만들어준다. 이 default snippets만 이용해서 api 문서를 만들어도 충분하다.
위 테스트코드를 실행한 결과로 나오는 snippet들을 이용하여 최종적으로 문서에 넣어 api 문서를 만든다.
=== CREATE

- curl 요청
include::{snippets}/article/create/curl-request.adoc[]
- 요청 예시
include::{snippets}/article/create/http-request.adoc[]
- 요청 파라미터
include::{snippets}/article/create/request-parameters.adoc[]
- 응답 예시
include::{snippets}/article/create/http-response.adoc[]
- 응답 헤더
include::{snippets}/article/create/response-headers.adoc[]
- 응답 필드
include::{snippets}/article/create/response-fields.adoc[]
01/03
동등성과 동일성
동등성(equals), 동일성(==)
동일성은 두 객체가 완전하게 동일한 것(참조까지 똑같다.)
동등성은 두 객체가 같은 내용을 가지고 있음
public class Amount {
    private int amount;
    private String name;

    public Amount(int amount, String name) {
        this.amount = amount;
        this.name = name;
    }

    public int getAmount() {
        return amount;
    }

    public String getName() {
        return name;
    }

    @Override
    public boolean equals(Object o) {
        if (this == o) return true;
        if (o == null || getClass() != o.getClass()) return false;
        Amount amount1 = (Amount) o;
        return amount == amount1.amount &&
                Objects.equals(name, amount1.name);
    }

    @Override
    public int hashCode() {
        return Objects.hash(amount, name);
    }
}
위와 같은 Amount 객체에 equals와 hashcode를 재정의 한다.
@Test
void equals() {
    Amount amount = new Amount(1000, "Test");
    Amount amount2 = new Amount(1000, "Test");

    System.out.println(amount.equals(amount2)); // true
    System.out.println(amount==amount2); // false
    assertEquals(amount, amount2); // true
    assertSame(amount, amount2); // false
}
amount, amount2 객체를 ==로 비교하면, 각 객체의 주소값만을 비교하고 정확하게 일치할 경우에만 true이다.
equals를 재정의 했기 때문에, Amount 객체 내에 amount와 name이 같을 경우 동등하기 때문에 equals로 true가 나온다. 하지만 amount와 amount2 객체의 주소는 실제로 다르기 때문에, ==로 비교할 경우에는 false가 나온다.
hashcode()는 HashSet, HashMap을 사용할 경우에 객체의 의미상 동등성을 비교하기 위해서 hashcode도 재정의 한다.
01/02
Java에서 Exception에 관하여
- Exception은 개발자가 구현한 로직에서 발생한다. 예외는 발생할 상황을 미리 예측해서 처리할 수 있다. 예외는 개발자가 처리 할 수 있기 때문에, 예외를 구분하고 그에 따른 처리 방법을 명확히 알고 적용하는 것이 중요하다.
- Exception은 개발자가 로직을 추가하여 처리할 수 있다.
- Exception은 많은 자식 클래스를 가지고 있다.
- RuntimeException은 CheckedException과 UncheckedException을 구분하는 기준이다. RuntimeException을 제외한 모든 Exception의 자식 클래스는 CheckedException이고 RuntimeException과 그의 자식 클래스들은 모두 UncheckedException이다.
CheckedException => RuntimeException을 제외한 모든 Exception => 반드시 처리해 주어야 함(메서드 밖으로 throw하거나 catch 해줘야함)
| Checked Exception | Unchecked Exception |
|---|---|
| 반드시 예외를 처리해야 함 | 반드시 처리하지 않아도 됨 |
| 컴파일 단계에서 확인(CompileTime Exception) | 실행 단계에서 확인(Runtime Exception) |
| Roll-back 하지 않는다(Transaction 처리) | Roll-back |
| Runtime Exception을 제외한 모든 예외 | ex) NullPointerException, IllegalArgumentException, IndexOutOfBoundException, SystemException 등 |
Unchecked Exception, Checked Exception을 사용할 것인지 결정하는 가장 기본적인 규칙은 호출하는 쪽에서 복구, 대처할 수 있다면 Checked Exception을 던진다. 아닐 경우에는 Unchecked Exception을 던진다.
그러면 Checked Exception은 언제 써야할까? 예외 복구 전략이 명확하고, 가능한 방법이라면 checked exception을 던지고 try-catch 에서 마땅한 복구를 해야한다.
SQLException은 CheckedException이지만 대부분의 경우에는 복구할 방법이 없다.(SQL 문법이 틀렸거나, DB Connection을 가져올 수 없거나.) 그렇기 때문에 이를 잡아서 unchecked exception으로 바꾸고 예외에 대한 메세지를 명확하게 전달해야한다. Spring에서 사용하는 JdbcTemplate에서도 SQLException을 잡아서 uncheckedException인 DataAccessException 으로 전환해서 던진다.
그러면 Checked Exception vs. Unchecked Exception 은?
가장 큰 차이는 예외를 명시적으로 처리 해주어야 하냐, 아니냐의 차이이다. 그리고 잘은 모르지만 예외 발생 시 트랜잭션을 roll-back 하느냐, 안하느냐 의 차이도 있다.
내 경우엔 CustomException은 모두 RuntimeException을 상속받아서 만들었는데, 이유는 Custom으로 만든 예외들은 모두 내가 예측 가능한 상황(유저가 패스워드를 틀리거나, DB에 없는 유저로 로그인을 하려고 한다거나..)에 대한 예외이기 때문에, 이 예외에 대한 처리를 할 필요가 없고 복구할 필요가 없기 때문에 unchecked exception으로 던졌다. Custom Exception을 던지면서 시스템 적으로 어떤 요청이 들어왔는지 로그로 남겨놓을 때 명시적으로 어떤 문제 때문에 발생했는지 표현하기 위해서 만들었다.
Checked Exception은 트랜잭션 roll-back하지 않는다는 것을 알아두어야 실수하지 않을 수 있다.
Checked Exception은 꼭 필요한 곳에서만 사용하면 프로그램의 안전성을 높여주지만, 남용한다면 그 메서드를 사용하는 쪽에서 try-catch가 사용되어야 하고, stream에서 사용할 수 없는 불편한 메서드가 많아진다. API 호출자가 예외 상황에서 복구할 방법이 없다면 unchecked exception을 던지는 편이 낫다. 복구가 가능하고 caller가 그 처리를 해주기를 바란다면 optional로 해결이 가능할 지 고민해보자.
참고 자료(Exception)
- http://wonwoo.ml/index.php/post/878
- https://cheese10yun.github.io/checked-exception/
- Effective Java 3/e
Javascript 기초
let은 block scope를 지원한다.
<ul>
    <li>Java</li>
    <li>Javascript</li>
    <li>Spring</li>
    <li>Vue</li>
</ul>
이런 html이 있다고 생각해보고, 이 리스트에 event를 걸어준다고 해보자. 사실 보통은 다른 방식으로 하지만 하나하나 list요소들에 이벤트를 넣어줄 수도 있으니..
var list = document.querySelectorAll("li");
for (var i = 0; i < list.length; i++) {
    list[i].addEventListener("click", function() {
        console.log(i + "번째 요소입니다.");
    });
}
위와 같은 방식으로 구현한 후 리스트 요소들을 눌러보면, 어떤 리스트 요소들을 누르더라도 4번째 요소라고 나오게 된다.
- closure란?
function outter() {
    var title = 'coding everybody';
    return function() {
        alert(title);
    }
}
var inner = outter();
inner();
outter() 라는 함수는 실행이 끝나고 inner라는 함수가 실행할 때, outter() 함수에서의 변수에 대한 접근을 할 수 있다.. 이게 closure의 중요한 특징이다.
function factory_movie(title) {
    return {
        get_title: function() {
            return title;
        },
        set_title: function(_title) {
            title = _title;
        }
    }
}
ghost = factory_movie('Ghost in the shell');
matrix = factory_movie('Matrix');
alert(ghost.get_title()); // Ghost in the shell
alert(matrix.get_title()); // Matrix
ghost.set_title('공각기동대');

alert(ghost.get_title()); // 공각기동대
alert(matrix.get_title()); // Matrix
ghost 와 matrix는 같은 객체이지만 그 객체안에 들어있는 get_title이 접근하는 외부 함수의 title이라는 값이 다르다.
factory_movie라는 메서드의 title이라는 변수는 factory_movie가 return 하면서 직접 접근할 수 없어지지만, 그 내부의 get_title, set_title이라는 메서드로만 접근 가능해진다.
var arr = []
for (var i = 0; i < 5; i++) {
    arr[i] = function() {
        return i;
    }
}
for (var i in arr) {
    console.log(arr[i]());
}
이 경우엔 원하는 대로 동작하지 않는다. 이를 closure의 특성을 생각하여 변경하면 원하는 대로 동작한다(1~4 출력)
var arr = []
for (var i = 0; i < 5; i++) {
    arr[i] = function(id) {
        return function() {
            return id;
        }
    }(i);
}
for (var i in arr) {
    console.log(arr[i]());
}
참고자료(Closure)
01/01
OAuth 2.0
OAuth의 전체 흐름은 아래와 같다.
일단 Client는 Resource Server에 자신의 애플리케이션(Heaven라고 해보자)을 등록하는 과정을 거친다.(그러면 Client Id, Client Secret, Redirect URL을 설정해야 한다.)
현재 상태는 아래 그림과 같다.
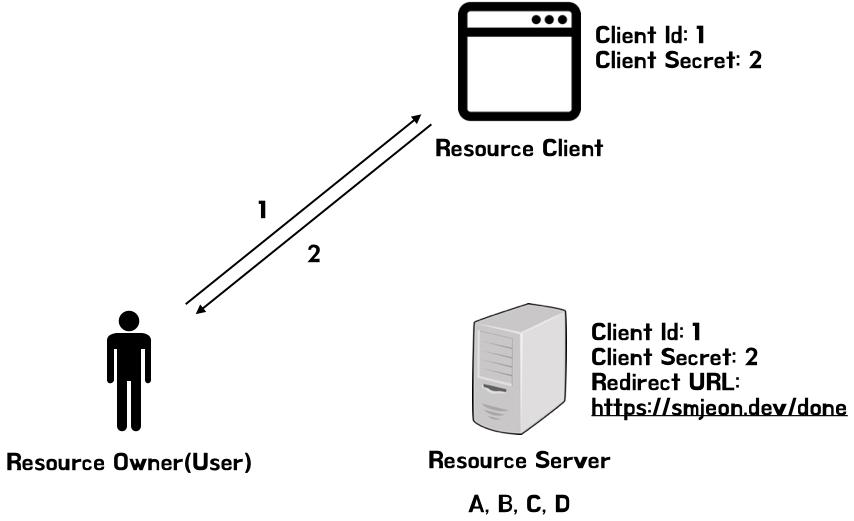
- 사용자(Resource Owner)는 Client(Heaven)의 Login 버튼을 누른다.
- 그러면 Client 는 다음과 같은 페이지를 띄워준다.

위의 사진 예시에서 살펴보면, https://resource.server/?client_id=1&scope=B,C&redirect_uri=https://smjeon.dev/done의 경로로 요청을 보낼 것이다. 그러면 Resource Server의 B, C 권한을 요청하는 인증요청을 보낸다.
그러면 Resource Server는 현재 Resource Owner가 로그인이 되어 있는지 확인 후 되어있지 않다면, 로그인을 하라는 화면을 보여준다. 로그인을 성공했다면, Resource Server는 Client ID값과 같은 Client ID가 있는 지 확인하고, redirect URI가 동일한 지 확인 한다. 동일하다면, 처음에 요청한 B, C 권한을 Client(Heaven)에 허용할 것이냐 라는 메세지를 보여준다. 그 다음 허용한다고 하면, Resource Server에 해당 정보를 기억해놓는다.
그 이후 Resource Server는 Resource Owner의 브라우저를 Redirect URI로 code를 담아서 redirect 시킨다. 그러면 이 Redirect URI로 요청을 받은 Client(Heaven)은 Authorization Code를 받는다.
Client는 이 code를 가지고 Resource Server에 직접 접근한다.(https://resource.server/token?grant_type=authorization_code&code=3&redircet_uri=https://smjeon.dev/done&client_id=1&client_secret=2와 같은 경로로 요청한다.) Resource Server는 Client Id, Client Secret, Code가 모두 일치하면 Client에게 해당 유저에 대한 Access Token(4)을 발급해준다.
Client(Heaven)는 발급받은 Access Token을 저장 해 둔다. 그 이후에는 이 Access Token(4)을 가지고 Resource Server에 실제 사용자(Resource Owner)의 B, C 권한에 대한 접근을 할 수 있다.
실제로 구현한 것을 기준으로 살펴보면, 1, 2번 과정을 거치면 https://kauth.kakao.com/oauth/authorize?client_id=f2f338d4cd150b4802b3dec123673221&redirect_uri=http://localhost:8080/oauth&response_type=code 의 경로로 요청을 보낸다.
그리고 Resource Owner는 kakao 로그인을 완료하고, 요청한 권한에 대한 승인을 한다. 그 이후 Resource Owner의 브라우저는 설정 해두었던 redirect uri인 /oauth 경로로 redirect 된다. redirect 할 때, code를 담아서 redirect 한다.
우리는 구현을 다음과 같이 했는데, /oauth 경로로 요청이 들어왔을 때, code 값을 받아오고 Resource Server인 카카오 서버에 client id와 redirect uri와 기타 정보들을 담아서 요청을 보낸다.
@GetMapping("/oauth")
public ResponseEntity oauth(HttpSession httpSession, @RequestParam("code") String code) {
    LOGGER.info("code: {}", code);

    TokenInfo tokenInfo = kakaoApiService.getTokenInfo(code);
    LOGGER.info("tokenInfo: {}", tokenInfo);

    String accessToken = tokenInfo.getAccess_token();
    String refreshToken = tokenInfo.getRefresh_token();

    User user = userService.save(kakaoApiService.getUser(accessToken, refreshToken));
    LOGGER.info("user: {}", user);

    UserSession userSession = new UserSession(user.getId(), user.getName(), accessToken);
    httpSession.setAttribute(UserSession.USER_SESSION, userSession);

    HttpHeaders headers = new HttpHeaders();
    headers.add("Location", "/");
    return new ResponseEntity<String>(headers, HttpStatus.FOUND);
}

// kakaoApiService.java
public TokenInfo getTokenInfo(String code) {
    TokenInfo tokenInfo = WebClient.create(kakaoConfig.getAuth().get("host"))
            .post()
            .uri(uriBuilder -> uriBuilder
                    .path(kakaoConfig.getAuth().get("tokenPath"))
                    .queryParam("grant_type", "authorization_code")
                    .queryParam("client_id", kakaoConfig.getAuth().get("clientId"))
                    .queryParam("redirect_uri", kakaoConfig.getAuth().get("redirectUri"))
                    .queryParam("code", code).build())
            .retrieve()
            .bodyToMono(TokenInfo.class)
            .block();

    LOGGER.info("tokenInfo: {}", tokenInfo);

    return tokenInfo;
}
이 과정을 거친 후 Resource Server에서는 access token을 client인 나에게 발급 해준다. 응답 온 것을 살펴보면 다음과 같다. access_token=pJqhveNPaqFToYHMT2b6JxbBgmeitxoBSYjLbAopyNkAAAFvYOJNaA, token_type=bearer, refresh_token=BlCnewxrmPdpnBEI5c_WhgtssdXAaDJzjdlqEAopyNkAAAFvYOJNZw, expires_in=21599, scope=age_range birthday account_email gender profile, refresh_token_expires_in=5183999 Access Token과 Refresh Token과 우리 어플리케이션이 요청했던 권한을 응답으로 되돌려주는 것을 알 수 있다.
이 Access Token을 가지고 Client는 Resource Server로부터 처음에 요청했던 권한에 대한 정보들을 얻을 수 있다.
카카오 로그인 API의 경우는, 설정 > 고급 > Client Secret에서 생성한 client_secret 코드 active 상태일 경우에는 필수로 설정해야 한다.
추가적으로 refresh_token은 설정된 유효기간 만큼 유효하고, refresh token의 만료가 1달 이내로 남은 시점에서 사용자 토근 갱신 요청을 하면 갱신된 access token과 갱신된 refresh token이 함께 반환된다. 요청은 다음과 같이 한다.
curl -v -X POST https://kauth.kakao.com/oauth/token \
 -d 'grant_type=refresh_token' \
 -d 'client_id={app_key}' \
 -d 'refresh_token={refresh_token}'
이에 대한 응답은 다음과 같이 온다.
HTTP/1.1 200 OK
Content-Type: application/json;charset=UTF-8
{
    "access_token":"wwwwwwwwwwwwwwwwwwwwwwwwwwwwwwwwwwwwwwwwwwwwwwwwwwwwww",
    "token_type":"bearer",
    "refresh_token":"zzzzzzzzzzzzzzzzzzzzzzzzzzzzzzzzzzzzzzzzzzzzzzzzzzzzzz",  //optional
    "expires_in":43199,
}
댓글남기기