Spring Security Default Filter
Spring Security의 구조를 살펴보면, 사용자의 요청이 들어온 후 가장 먼저 처리되는 곳이 바로 Filter(FilterChain)이다.
Spring Boot 기반으로 Spring Security를 사용하다보면, 시큐리티에서 기본적으로 생성하는 filter 들이 있다. 그 filter에 대해 정리해보기로 한다. 전체 구조를 한번에 이해하고 사용할 수 있으면 좋겠지만, 그렇게 기억력이 좋지 않기 때문에 기억이 안날 때마다 참고하기 위해 글로 작성합니다.
그 전에 일단 스프링 시큐리티의 기본 구조에 대해서 알아보자.
DelegatingFilterProxy
스프링은 DelegatingFilterProxy라는 필터 구현체를 제공하는데, 이는 Servlet Container의 생명 주기와 스프링의 ApplicationContext사이를 연결해주는 역할을 한다. 서블릿 컨테이너는 서블릿 표준에 따라 필터를 등록하기 때문에, 스프링에서 정의된 빈들을 인지하지 못한다. DelegatingFilterProxy는 표준 서블릿 컨테이너 메커니즘을 통해 필터를 등록하지만, 그 필터로 구현된 스프링 빈에게 모든 일을 위임한다.
아래 그림은 필터와 필터체인에 어떻게 적용하는지 나타내는 그림이다.(출처: Spring Security 공식문서)
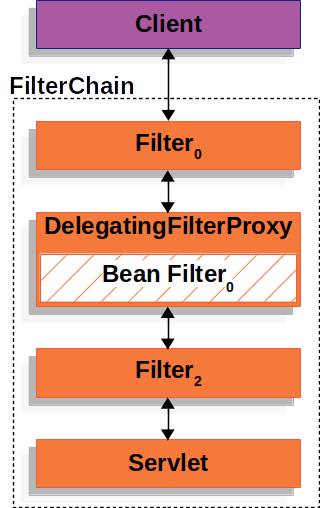
DelegatingFilterProxy는 Bean Filter 0을 ApplicationContext에서 찾고, Bean Filter 0을 호출한다. DelegatingFilterProxy의 코드를 가져와보면 아래와 같다.
@Override
public void doFilter(ServletRequest request, ServletResponse response, FilterChain filterChain)
        throws ServletException, IOException {

    // Lazily initialize the delegate if necessary.
    Filter delegateToUse = this.delegate;
    if (delegateToUse == null) {
        synchronized (this.delegateMonitor) {
            delegateToUse = this.delegate;
            if (delegateToUse == null) {
                WebApplicationContext wac = findWebApplicationContext();
                if (wac == null) {
                    throw new IllegalStateException("No WebApplicationContext found: " +
                            "no ContextLoaderListener or DispatcherServlet registered?");
                }
                delegateToUse = initDelegate(wac);
            }
            this.delegate = delegateToUse;
        }
    }

    // Let the delegate perform the actual doFilter operation.
    invokeDelegate(delegateToUse, request, response, filterChain);
}
ApplicationContext를 찾고, initDelegate(wac)를 통해 위임할 필터를 찾는다. 그 코드도 보면 아래와 같다.
protected Filter initDelegate(WebApplicationContext wac) throws ServletException {
    String targetBeanName = getTargetBeanName();
    Assert.state(targetBeanName != null, "No target bean name set");
    Filter delegate = wac.getBean(targetBeanName, Filter.class);
    if (isTargetFilterLifecycle()) {
        delegate.init(getFilterConfig());
    }
    return delegate;
}
targetBeanName으로 된 Filter를 찾고 그 필터를 Delegate로 갖는다. 그리고 invokeDelegate를 통해 delegate.doFilter를 호출하여 해당 필터에 모든 일을 위임한다.
공식문서에 나온 DelegatingFilterProxy의 또 다른 이점은 Filter Bean의 인스턴스화를 지연시킬 수 있다는 것이다. 서블릿 컨테이너가 시작되기 전에 필터 인스턴스를 등록해야하기 때문에 중요하다. 그러나 스프링은 일반적으로 필터 인스턴스를 등록해야 할 때까지는 미리 등록 하지 않는 Spring Bean을 로드하기 위해 ContextLoaderListener를 사용한다.
FilterChainProxy
스프링 시큐리티의 서블릿 지원은 FilterChainProxy안에 있다. FilterChainProxy는 스프링 시큐리티에서 제공하는 특별한 필터로, SecurityFilterChain을 통해 많은 필터 인스턴스에 위임할 수 있게 한다. FilterChainProxy도 Spring Bean이기 때문에 위에서 말한 DelegatingFilterProxy로 포장되어 있다. SpringSecurityFilterChain 이름으로 생성되는 Bean으로 DelegatingFilterProxy로부터 요청을 위임받고 실제 보안 처리를 한다. 여기서 스프링 시큐리티가 생성하는 필터와 사용자가 설정 클래스를 통해 생성한 필터들의 체인을 순서대로 돈다.
SecurityFilterChain
위에서 본 FilterChainProxy에서 사용자의 요청에 맞는 필터들을 결정하기 위해 SecurityFilterChain은 사용된다.
이 SecurityFilterChain 내의 필터들은 일반적으로 bean이지만, DelegatingFilterProxy가 아닌 FilterChainProxy를 통해 등록된다. FilterChainProxy는 DelegatingFilterProxy나 Servlet Container를 통해 직접 등록하는 것보다 많은 이점이 있다.
- 스프링 시큐리티의 모든 서블릿 지원을 위한 시작점을 제공한다. 그래서 시큐리티의 서블릿 관련 문제를 해결하려면 여기에 디버깅 포인트를 잡고 살펴보는 것이 좋다.
- FilterChainProxy는 SpringSecurity 사용의 중심이기 때문에 옵션으로 보이지 않는 작업을 수행할 수 있다. 예를 들어 메모리 릭을 피하기 위해 SecurityContext를 지운다. 또는 스프링 시큐리티의 HttpFirewall을 적용해서 어떤 타입의 공격에서 어플리케이션을 보호할 수 있다.
- SecurityFilterChain을 호출할 때 더 많은 유연함을 제공한다. Servlet Container에서 Filter는 URL기반으로만 호출된다. 그러나 FilterChainProxy는 RequestMatcher를 통해 HttpServletRequest의 어떤 것을 기반으로 호출되게 만들 수 있다.
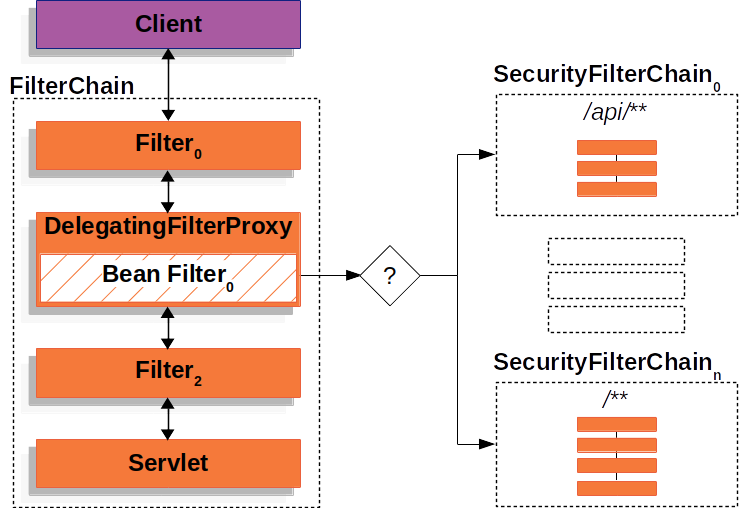
실제로 FilterChainProxy는 사용될 SecurityFilterChain을 결정하는데 사용될 수 있다. 아래 그림처럼 어플리케이션의 다른 부분에 대해 아예 다른 구성을 해서 분리할 수 있다.
스프링 시큐리티가 생성하는 필터들
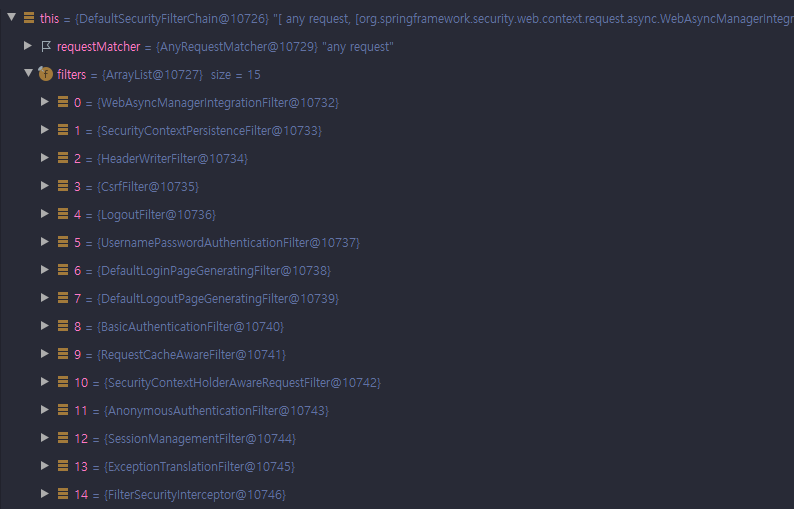
그러면 위에서 알아본 FilterChainProxy에 들어가는 시큐리티 필터들에 대해 알아보자. DefaultSecurityFilterchain에 들어가는 시큐리티 필터들의 리스트들은 다음과 같다. 이걸 순서대로 알아보자.
WebAsyncManagerIntegrationFilter
SecurityContextCallableProcessingInterceptor.beforeConcurrentHandling을 사용하여 Callable에 SecurityContext를 채우기 위해 SecurityContext와 Spring Web의 WebAsyncManager 간의 통합을 제공한다.
SecurityContextCallableProcessingInterceptor는 preProcess, postProcess, SecurityContextHolder.clearContext 메서드 같들에 의해 SecurityContextHolder에 주입된 SecurityContext를 설정하는 클래스다.
WebAsyncManager는 asynchronous reqeust를 관리하기 위한 클래스다.
결국 WebAsyncManagerIntegrationFilter는 Spring Web의 Async request와 SecurityContext를 연결해주는 역할을 하는 필터이다.
SecurityContextPersistenceFilter
- SecurityContext 객체 생성, 저장, 조회
- 최종 응답 후 SecurityContextHolder.clearContext() 한다.
인증 시 새로운 SecurityContext 객체를 생성하여 SecurityContextHolder에 저장한다. Filter를 통해 인증 성공 후 SecurityContext에 Authentication 객체를 저장한다. 인증이 최종 완료되면 HttpSession에 SecurityContext를 저장한다.
인증 후에는,
- Session에서 SecurityContext를 꺼내서 SecurityContextHolder 에 저장
- SecurityContext 내에 Authentication 객체가 존재하면 인증된 상태를 유지한다.
동작 흐름
- 요청이 SecurityContextPersistenceFilter로 들어온다.
- HttpSecurityContextRepository에서 인증이 되었는지 확인한다.
- 인증이 안된 상태라면 SecurityContext 객체를 생성하여 SecurityContextHolder에 저장한다.
- FilterChain을 돌면서 인증 절차를 거친 후 인증 성공 후 SecurityContext에 Authentication 객체를 저장한다.
- 인증 최종 완료 후 HttpSession에 SecurityContext를 저장한다.
- SecurityContextHolder에서 SecurityContext를 clear한다.
- 인증이 된 상태라면 Session에서 SecurityContext를 꺼내서 SecurityContextHolder에 저장한다.
- SecurityContext 내에 Authentication 객체가 있는지 확인 한 후 있다면, 인증된 상태를 유지한다.
HeaderWriterFilter
현재 응답에 헤더를 추가하기 위해 구현된 필터, X-Frame-Options, X-XSS-Protection, X-Content-Type-Options 같은 브라우저 보호를 켜는 헤더들을 추가하는데 유용하다.
필드로 List<HeaderWriter> headerWriters를 가지고 있고 내부에 shouldWriteHeadersEagerly 값을 설정하여 request의 시작에 헤더를 쓸지 말지를 설정할 수 있다.
CsrsFilter
CSRF 취약점을 방지할 수 있도록 제공하는 필터다. 모든 요청에 랜덤하게 생성된 토큰을 HTTP 파라미터로 요구한다. 요청 시 전달되는 토큰 값과 서버에 저장된 토큰 값이 일치하지 않으면 요청이 실패한다. 요청 실패시 accessDeniedHandler가 CsrfTokenException 같은 예외를 처리하게 된다.
@Override
protected void doFilterInternal(HttpServletRequest request,
        HttpServletResponse response, FilterChain filterChain)
                throws ServletException, IOException {
    request.setAttribute(HttpServletResponse.class.getName(), response);

    CsrfToken csrfToken = this.tokenRepository.loadToken(request);
    final boolean missingToken = csrfToken == null;
    if (missingToken) {
        csrfToken = this.tokenRepository.generateToken(request);
        this.tokenRepository.saveToken(csrfToken, request, response);
    }
    request.setAttribute(CsrfToken.class.getName(), csrfToken);
    request.setAttribute(csrfToken.getParameterName(), csrfToken);

    if (!this.requireCsrfProtectionMatcher.matches(request)) {
        filterChain.doFilter(request, response);
        return;
    }

    String actualToken = request.getHeader(csrfToken.getHeaderName());
    if (actualToken == null) {
        actualToken = request.getParameter(csrfToken.getParameterName());
    }
    if (!csrfToken.getToken().equals(actualToken)) {
        if (this.logger.isDebugEnabled()) {
            this.logger.debug("Invalid CSRF token found for "
                    + UrlUtils.buildFullRequestUrl(request));
        }
        if (missingToken) {
            this.accessDeniedHandler.handle(request, response,
                    new MissingCsrfTokenException(actualToken));
        }
        else {
            this.accessDeniedHandler.handle(request, response,
                    new InvalidCsrfTokenException(csrfToken, actualToken));
        }
        return;
    }

    filterChain.doFilter(request, response);
}
위에서 부터 따라가보면, 토큰이 tokenRepository에 있는지 확인하고, 없으면 새로 만든다.(generateToken(request)) generateToken 메서드는 다음과 같다.
public CsrfToken generateToken(HttpServletRequest request) {
    return new DefaultCsrfToken(this.headerName, this.parameterName,
            createNewToken());
}

private String createNewToken() {
    return UUID.randomUUID().toString();
}
이처럼 랜덤 UUID로 새로운 토큰을 만들어서 tokenRepository에 넣는다. 그리고 요청 시에 전달된 토큰 값과 tokenRepository에 저장된 토큰값이 일치하지 않으면(!csrfToken.getToken().equals(actualToken)) 요청이 실패하고, accessDeniedHandler에서 처리하게 된다.
LogoutFilter
로그아웃 요청을 하면 이 필터에서 처리한다. Logout시에는 세션 무효화, 인증토큰 삭제, 쿠키정보 삭제, 로그인 페이지로 리다이렉트 한다.
- 로그아웃 요청이 들어온다.
- RequestMatcher가 로그아웃 URL이 맞는지 확인한다.(일치하지 않으면 filterChain의 다음 필터로 이동)
- SecurityContext에서 Authentication 객체를 꺼내와서 SecurityContextLogoutHandler로 전달
- 세션 무효화, 쿠키 삭제, SecurityContextHolder.clearContext() 한다.
- LogoutFilter는 SimpleUrlLogoutSuccessHandler에서 성공 이후 처리를 한다.(redirect:/)
// LogoutFilter.java
public void doFilter(ServletRequest req, ServletResponse res, FilterChain chain)
        throws IOException, ServletException {
    HttpServletRequest request = (HttpServletRequest) req;
    HttpServletResponse response = (HttpServletResponse) res;

    if (requiresLogout(request, response)) {
        Authentication auth = SecurityContextHolder.getContext().getAuthentication();

        if (logger.isDebugEnabled()) {
            logger.debug("Logging out user '" + auth
                    + "' and transferring to logout destination");
        }

        this.handler.logout(request, response, auth);

        logoutSuccessHandler.onLogoutSuccess(request, response, auth);

        return;
    }

    chain.doFilter(request, response);
}

// SecurityContextLogoutHandler.java
public void logout(HttpServletRequest request, HttpServletResponse response,
        Authentication authentication) {
    Assert.notNull(request, "HttpServletRequest required");
    if (invalidateHttpSession) {
        HttpSession session = request.getSession(false);
        if (session != null) {
            logger.debug("Invalidating session: " + session.getId());
            session.invalidate();
        }
    }

    if (clearAuthentication) {
        SecurityContext context = SecurityContextHolder.getContext();
        context.setAuthentication(null);
    }

    SecurityContextHolder.clearContext();
}
requiresLogout(req, res)부분에서 requestMatcher에서 match하는지 확인하고, handler에서 로그아웃 요청을 한다.- SecurityContextLogoutHandler에서 세션 무효화, Authentication 초기화, clearContext() 를 처리한다.
- 그 다음
logoutSuccessHandler.onLogoutSuccess(request, response, auth);에서 로그아웃 이후 처리를 한다.
UsernamePasswordAuthenticationFilter
Form Login시 요청을 처리하는 필터다.
- AntPathRequestMatcher(“/login”) - 요청 정보가 매칭되는지 확인
- No: chain.doFilter
- Yes: 2으로 이동
- Authentication (Username + Password)을 가지고 4에 인증 요청
- AuthenticationManager는 5에 인증 위임
- AuthenticationProvider - 실제 인증 작업이 이뤄지는 곳
- 인증 실패 - AuthenticationException
- 인증 성공 - 인증 성공한 Authentication 객체를 AuthenticationManager에 반환, 6으로 이동
- SecurtyContext에 인증 성공한 객체를 저장
- SuccessHandler에서 성공 이후 흐름 처리
public Authentication attemptAuthentication(HttpServletRequest request,
        HttpServletResponse response) throws AuthenticationException {
    if (postOnly && !request.getMethod().equals("POST")) {
        throw new AuthenticationServiceException(
                "Authentication method not supported: " + request.getMethod());
    }

    String username = obtainUsername(request);
    String password = obtainPassword(request);

    if (username == null) {
        username = "";
    }

    if (password == null) {
        password = "";
    }

    username = username.trim();

    UsernamePasswordAuthenticationToken authRequest = new UsernamePasswordAuthenticationToken(
            username, password);

    // Allow subclasses to set the "details" property
    setDetails(request, authRequest);

    return this.getAuthenticationManager().authenticate(authRequest);
}
이게 스프링 시큐리티에서 기본적으로 적용하는 필터의 인증 코드이다. 이 클래스에서 하는 역할을 나는 다음과 같이 다시 작성하였다.
@Override
public Authentication attemptAuthentication(HttpServletRequest req, HttpServletResponse res) throws AuthenticationException, IOException, ServletException {
    String email = req.getParameter("email");
    String password = req.getParameter("password");

    UserLoginRequest userLoginRequest = new UserLoginRequest(new Email(email), new Password(password));
    PreAuthorizationToken token = new PreAuthorizationToken(userLoginRequest);

    logger.debug("Requested Login Email: {}", email);

    return super.getAuthenticationManager().authenticate(token);
}
코드의 흐름 자체는 차이가 없고, 사용하는 principal, credential만 다르게 사용했음을 알 수 있다.
DefaultLoginPageGeneratingFilter, DefaultLogoutPageGeneratingFilter
이름에서 유추할 수 있는 그대로의 필터다. 우리가 설정에서 따로 로그인, 로그아웃 페이지를 설정하지 않으면 기본적으로 제공하는 로그인 페이지, 로그아웃 페이지를 만드는 필터다. 각 필터에 들어가서 내용을 확인해보면 html 파일을 StringBuilder로 작성해놓은 것을 볼 수 있다.
BasicAuthenticationFilter
HTTP 요청의 Basic 인증 헤더를 처리하고 그 결과를 SecurityContextHolder에 넣는 일을 하는 필터이다. 요약해서 Authorization의 HTTP reqeust header를 가진 어떤 요청을 처리하는 필터이다. (Basic authentication scheme, Base64 encoding)
- 자원 접근 시 Client에 401 Unauthorized 응답, WWW-Authenticate header로 인증 요청을 보낸다.
- Client는 Base64 encoding된 ID, Password를 Authorization header에 추가 후 서버에 자원을 요청한다. (Authorization: Basic QWxhZGRpbjpvcGVuIHNlc2FtZQ==)
RequestCacheAwareFilter
저장된 요청이 현재 요청과 일치하는 경우(캐시된 경우) 저장된 요청을 재사용하는 필터다.
public void doFilter(ServletRequest request, ServletResponse response,
        FilterChain chain) throws IOException, ServletException {

    HttpServletRequest wrappedSavedRequest = requestCache.getMatchingRequest(
            (HttpServletRequest) request, (HttpServletResponse) response);

    chain.doFilter(wrappedSavedRequest == null ? request : wrappedSavedRequest,
            response);
}
보면 requestCache에 현재 요청과 일치하는게 있는지 확인하고, 일치하는 것이 있으면 그것을 사용하고 없으면 현재 요청이 들어온 것을 그대로 사용해서 다음 필터로 넘기는 것을 알 수 있다.
SecurityContextHolderAwareRequestFilter
Servlet API의 security method를 구현한 request wrapper로 ServletRequest를 채우는 필터다.
AnonnymousAuthenticationFilter
익명사용자에 대한 인증 처리 필터다. SecurityContextHolder에 아무 객체도 없는지(익명사용자) 체크하고, 필요하다면 채우는 필터다.
public void doFilter(ServletRequest req, ServletResponse res, FilterChain chain)
        throws IOException, ServletException {

    if (SecurityContextHolder.getContext().getAuthentication() == null) {
        SecurityContextHolder.getContext().setAuthentication(
                createAuthentication((HttpServletRequest) req));

        if (logger.isDebugEnabled()) {
            logger.debug("Populated SecurityContextHolder with anonymous token: '"
                    + SecurityContextHolder.getContext().getAuthentication() + "'");
        }
    }
    else {
        if (logger.isDebugEnabled()) {
            logger.debug("SecurityContextHolder not populated with anonymous token, as it already contained: '"
                    + SecurityContextHolder.getContext().getAuthentication() + "'");
        }
    }

    chain.doFilter(req, res);
}

protected Authentication createAuthentication(HttpServletRequest request) {
    AnonymousAuthenticationToken auth = new AnonymousAuthenticationToken(key,
            principal, authorities);
    auth.setDetails(authenticationDetailsSource.buildDetails(request));

    return auth;
}
코드를 쭉 읽어보면 SecurityContextHolder에서 SecurityContext를 꺼내서 Authentication 객체가 없는 경우 새로 만들어 주고(AnonymousAuthenticationToken), Authentication 객체가 있는 경우는 아무 것도 하지 않고(log만 남기고) 다음 필터로 넘어가는 것을 볼 수 있다.
SessionManagementFilter
세션과 관련된 여러 역할을 수행하는 필터다.
- 세션관리
- 동시적 세션 제어
- 세션 고정 보호
- 세션 정책 생성
public void doFilter(ServletRequest req, ServletResponse res, FilterChain chain)
        throws IOException, ServletException {
    HttpServletRequest request = (HttpServletRequest) req;
    HttpServletResponse response = (HttpServletResponse) res;

    if (request.getAttribute(FILTER_APPLIED) != null) {
        chain.doFilter(request, response);
        return;
    }

    request.setAttribute(FILTER_APPLIED, Boolean.TRUE);

    if (!securityContextRepository.containsContext(request)) {
        Authentication authentication = SecurityContextHolder.getContext()
                .getAuthentication();

        if (authentication != null && !trustResolver.isAnonymous(authentication)) {
            // The user has been authenticated during the current request, so call the
            // session strategy
            try {
                sessionAuthenticationStrategy.onAuthentication(authentication,
                        request, response);
            }
            catch (SessionAuthenticationException e) {
                // The session strategy can reject the authentication
                logger.debug(
                        "SessionAuthenticationStrategy rejected the authentication object",
                        e);
                SecurityContextHolder.clearContext();
                failureHandler.onAuthenticationFailure(request, response, e);

                return;
            }
            // Eagerly save the security context to make it available for any possible
            // re-entrant
            // requests which may occur before the current request completes.
            // SEC-1396.
            securityContextRepository.saveContext(SecurityContextHolder.getContext(),
                    request, response);
        }
        else {
            // No security context or authentication present. Check for a session
            // timeout
            if (request.getRequestedSessionId() != null
                    && !request.isRequestedSessionIdValid()) {
                if (logger.isDebugEnabled()) {
                    logger.debug("Requested session ID "
                            + request.getRequestedSessionId() + " is invalid.");
                }

                if (invalidSessionStrategy != null) {
                    invalidSessionStrategy
                            .onInvalidSessionDetected(request, response);
                    return;
                }
            }
        }
    }

    chain.doFilter(request, response);
}
위부터 쭉 코드를 따라가보면, 기존에 Session Management Filter가 적용되지 않았다면 아무것도 하지 않고 다음 필터로 넘어간다. 기존에 적용되고 있었다면 다음 로직을 수행한다.
- SecurityContext에 Authentication 객체가 있고, anonymous가 아닌경우 세션 정책에 맞게 인증을 하게된다. (이번 요청에서 인증을 받았다.)
- 인증 성공 시, SecurityContextRepository에 saveContext한다.
- 인증이 실패할 경우, SecurityContext clear하고 failureHandler로 넘긴다.
- 1번이 아닐 경우, 요청에서 SessionID를 체크하고 유효한지 점검한다.
SessionAuthenticationStrategy에 설정된 세션 인증 전략으로 이 필터의 행동을 수행한다.
ExceptionTranslationFilter
FilterChain에서 발생하는 AccessDeniedException(인가예외)와 AuthenticationException(인증예외)을 처리하는 필터다. 이 필터에서 하는 일은 다음 메서드에서 확인할 수 있다.
private void handleSpringSecurityException(HttpServletRequest request,
        HttpServletResponse response, FilterChain chain, RuntimeException exception)
        throws IOException, ServletException {
    if (exception instanceof AuthenticationException) {
        logger.debug(
                "Authentication exception occurred; redirecting to authentication entry point",
                exception);

        sendStartAuthentication(request, response, chain,
                (AuthenticationException) exception);
    }
    else if (exception instanceof AccessDeniedException) {
        Authentication authentication = SecurityContextHolder.getContext().getAuthentication();
        if (authenticationTrustResolver.isAnonymous(authentication) || authenticationTrustResolver.isRememberMe(authentication)) {
            logger.debug(
                    "Access is denied (user is " + (authenticationTrustResolver.isAnonymous(authentication) ? "anonymous" : "not fully authenticated") + "); redirecting to authentication entry point",
                    exception);

            sendStartAuthentication(
                    request,
                    response,
                    chain,
                    new InsufficientAuthenticationException(
                        messages.getMessage(
                            "ExceptionTranslationFilter.insufficientAuthentication",
                            "Full authentication is required to access this resource")));
        }
        else {
            logger.debug(
                    "Access is denied (user is not anonymous); delegating to AccessDeniedHandler",
                    exception);

            accessDeniedHandler.handle(request, response,
                    (AccessDeniedException) exception);
        }
    }
}
인증 예외가 발생한 경우(exception instanceof AuthenticationException) 다음 메서드가 실행된다.
protected void sendStartAuthentication(HttpServletRequest request,
        HttpServletResponse response, FilterChain chain,
        AuthenticationException reason) throws ServletException, IOException {
    // SEC-112: Clear the SecurityContextHolder's Authentication, as the
    // existing Authentication is no longer considered valid
    SecurityContextHolder.getContext().setAuthentication(null);
    requestCache.saveRequest(request, response);
    logger.debug("Calling Authentication entry point.");
    authenticationEntryPoint.commence(request, response, reason);
}
- Authentication 객체 초기화
- requestCache에 예외 발생 전의 요청정보 저장
- AuthenticationEntryPoint를 호출, 이 클래스를 구현한 구현체에서 이후 처리를 할 수 있도록 함(로그인 페이지로 이동한다거나, 401 코드 전달한다거나)
인가 예외가 발생한 경우(exception instanceof AccessDeniedException) 다음 두 가지 방향으로 처리한다.
- Anonymous 또는 RememberMe일 경우에는 InsufficientAuthenticationException를 발생시키는데 이는 AuthenticationException를 상속받은 예외이다. 그래서 다시 인증 예외쪽으로 빠진다.
- 그 외의 경우에는 AccessDeniedHandler를 구현한 구현체에서 이후 처리를 한다.
FilterSecurityInterceptor
마지막에 위치한 필터, 인증된 사용자에 대해 요청의 승인/거부 여부를 결정한다.
- 인증 객체 없이 자원에 접근 시도할 경우 AuthenticationException 발생
- 권한 없이 자원에 접근할 경우 AccessDeniedException 발생
- 권한 처리는 AccessDecisionManager에서 처리한다.
즉, SecurityContext내에 Authentication 객체가 존재하면, SecurityMetadataSource에서 요청한 자원에 필요한 권한 정보를 찾아서 AccessDecisionManager에 전달한다.
이해를 돕기위한 그림으로 스프링 시큐리티 공식문서의 그림을 첨부한다.
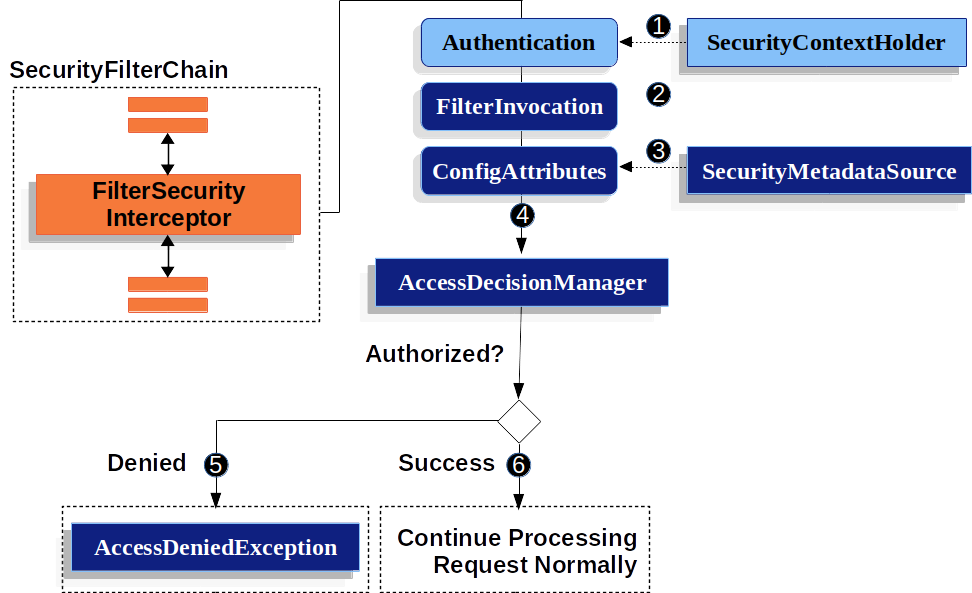
공식 문서에 나온 순서는 다음과 같다.
- FilterSecurityInterceptor는 SecurityContextHolder에서 Authentication 객체를 얻는다.
- FilterSecurityInterceptor HttpServletRequest, HttpServletResponse, FilterChain으로부터 FilterInvocation을 만든다.
- ConfigAttributes를 얻기 위해 SecurityMetadataSource에 FilterInvocation을 넘긴다.
- Authentication, FilterInvocation, ConfigAttributes를 AccessDecisionManager로 넘긴다.
- 5 인증이 실패하면, AccessDeniedException을 발생시킨다. 이 경우엔 위에서 언급했던 ExceptionTranslationFilter가 AccessDeniedException를 처리한다.
- 6 인증 성공시, FilterSecurityInterceptor는 어플리케이션을 다음 동작으로 진행시킨다.
public void doFilter(ServletRequest request, ServletResponse response,
        FilterChain chain) throws IOException, ServletException {
    FilterInvocation fi = new FilterInvocation(request, response, chain);
    invoke(fi);
}

public void invoke(FilterInvocation fi) throws IOException, ServletException {
    if ((fi.getRequest() != null)
            && (fi.getRequest().getAttribute(FILTER_APPLIED) != null)
            && observeOncePerRequest) {
        // filter already applied to this request and user wants us to observe
        // once-per-request handling, so don't re-do security checking
        fi.getChain().doFilter(fi.getRequest(), fi.getResponse());
    }
    else {
        // first time this request being called, so perform security checking
        if (fi.getRequest() != null && observeOncePerRequest) {
            fi.getRequest().setAttribute(FILTER_APPLIED, Boolean.TRUE);
        }

        InterceptorStatusToken token = super.beforeInvocation(fi);

        try {
            fi.getChain().doFilter(fi.getRequest(), fi.getResponse());
        }
        finally {
            super.finallyInvocation(token);
        }

        super.afterInvocation(token, null);
    }
}
코드를 쭉 따라가다보면, super.beforeInvocation(fi)부분에서 AbstractSecurityInterceptor에서 수행하는 것을 볼 수 있다. AbstractSecurityInterceptor의 해당 메서드 부분을 보면 accessDecisionManager에서 권한 처리를 하는 것을 볼 수 있다.
AccessDecisionManager
인가 여부를 결정하고 접근을 승인/거부 하는 클래스, 여러개의 Voter들을 가질 수 있고 각 Voter로부터 승인/거부/보류를 리턴 받고 판단한다.
접근결정 유형
- AffirmativeBased - Voter 중 하나라도 허가나면 허가
- ConsensusBased - 다수결로 결정, 동수일 경우 기본은 접근허가, allowIfEqualGrantedDeniedDecisions = false로 하면 접근 거부
- UnanimousBased - 만장일치로 허가가 나야 접근 허가
각 클래스들의 decide메서드의 구현을 보고 읽기만 해도 어떤 내용인지 이해가 된다. 코드는 불필요하게 내용이 길어지는 것 같아 생략하지만, 읽기만 해도 어떤 의미인지 이해할 수 있다.
AccessDecisionVoter
접근을 허가/거부할 지 판단하는 곳, Authentication, FilterInvocation, ConfigAttributes를 받아서 판단한다.
public interface AccessDecisionVoter<S> {
    // ~ Static fields/initializers
    // =====================================================================================

    int ACCESS_GRANTED = 1;
    int ACCESS_ABSTAIN = 0;
    int ACCESS_DENIED = -1;
이외의 필터
공식 문서에는 나와있지만, 아무 설정도 안했을 때는 들어가지 않는 filter들이 있다.
- ChannelProcessingFilter
- ConcurrentSessionFilter
- CorfFilter
- OAuth2AuthorizationRequestRedirectFilter
- Saml2WebSsoAuthenticationRequestFilter
- X509AuthenticationFilter
- AbstractPreAuthenticatedProcessingFilter
- CasAuthenticationFilter
- OAuth2LoginAuthenticationFilter
- Saml2WebSsoAuthenticationFilter
- OpenIDAuthenticationFilter
- DigestAuthenticationFilter
- BearerTokenAuthenticationFilter
- RequestCacheAwareFilter
- JaasApiIntegrationFilter
- RememberMeAuthenticationFilter
- OAuth2AuthorizationCodeGrantFilter
- SwitchUserFilter
이 부분은 나중에 알아보자.
참고자료
- Spring Security Docs - 9. Servlet Security
- Spring Security 코드
- 인프런 강의
댓글남기기